Installation#
Stable release#
This is the preferred method to install Quantify, as it will always install the most recent stable release. If you want to contribute to Quantify, see Setting up for local development.
Quick Install Guide#
(This section assumes familiarity with basic software development concepts. For an extended explanation, follow the Detailed instructions and learn a few productivity tips on your way.)
We recommend installing quantify-core in a virtual environment such as
Anaconda to avoid environment-specific
problems, together with JupyterLab for its user-friendly interface for
notebooks.
Install Anaconda.
Open Anaconda Prompt and run the following
$ conda create --name quantify-env python=3.12
$ conda activate quantify-env
$ conda install -c conda-forge jupyterlab
$ python -m ipykernel install --user --name=quantify-env  --display-name="Python 3 Quantify Env"
$ pip install quantify-core

$ # (Optionally) install quantify-scheduler:
$ pip install quantify-scheduler
Install Anaconda.
Open a terminal and run the following
$ conda create --name quantify-env python=3.12
$ conda activate quantify-env
$ conda install -c conda-forge jupyterlab
$ python -m ipykernel install --user --name=quantify-env  --display-name="Python 3 Quantify Env"
$ pip install quantify-core

$ # (Optionally) install quantify-scheduler:
$ pip install quantify-scheduler
Install Anaconda.
If you have a newer MacBook with either an M1 or M2 chip (Apple Silicon, ARM), you will have to run
quantify-corein an x86 compatibility mode. This is achieved by creating a Conda environment that targets the “osx-64” subdirectory, which ensures that the installation and execution will occur within an x86 environment on your MacBook.$ CONDA_SUBDIR=osx-64 conda create --name quantify-env python=3.12 $ conda activate quantify-env $ conda config --env --set subdir osx-64 $ conda install -c conda-forge jupyterlab $ python -m ipykernel install --user --name=quantify-env --display-name="Python 3 Quantify Env" $ pip install quantify-core $ # (Optionally) install quantify-scheduler: $ pip install quantify-scheduler
For older MacBooks, you can run
$ conda create --name quantify-env python=3.12
$ conda activate quantify-env
$ conda install -c conda-forge jupyterlab
$ python -m ipykernel install --user --name=quantify-env  --display-name="Python 3 Quantify Env"
$ pip install quantify-core

$ # (Optionally) install quantify-scheduler:
$ pip install quantify-scheduler
You are good to go! Head over to the User guide to get started.
Detailed instructions#
Currently,
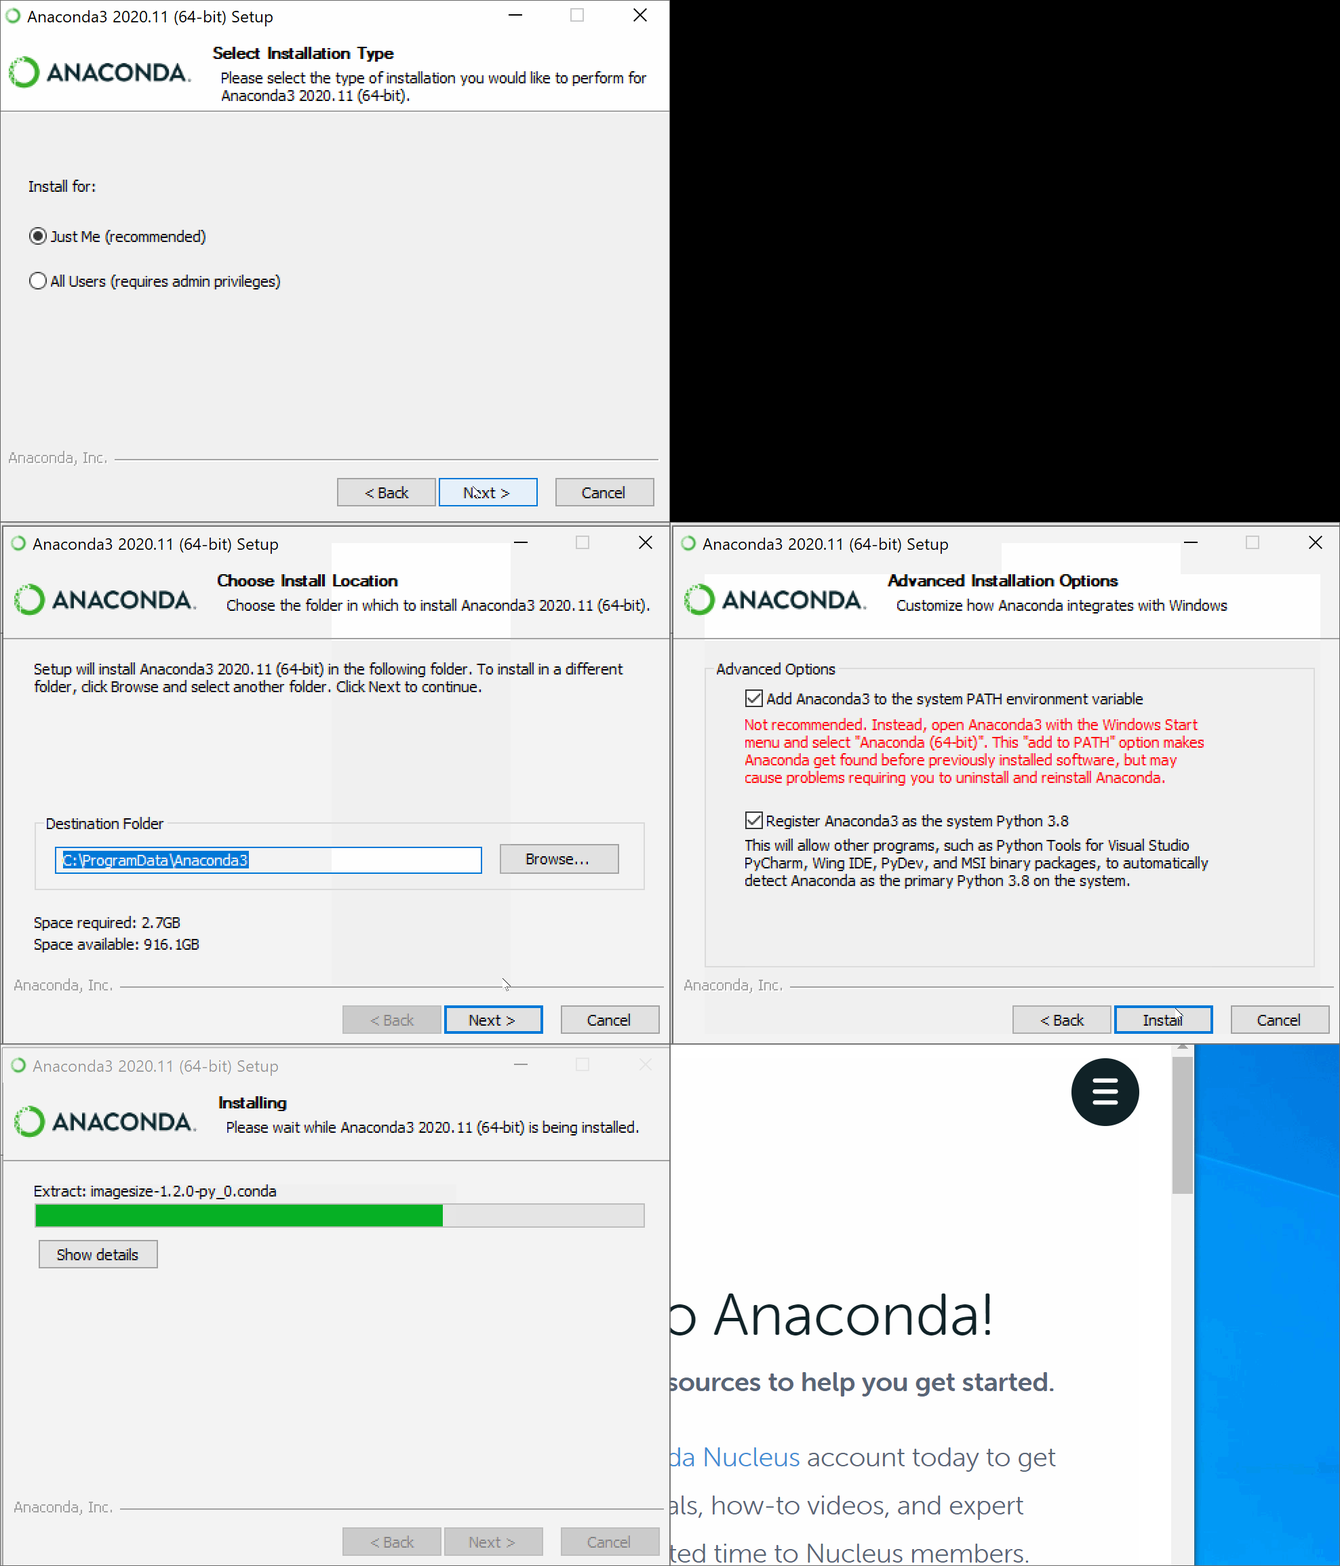
quantify-coreis compatible with Python versions3.9,3.10,3.11,3.12andquantify-schedulerwith Python versions3.9,3.10,3.11and3.12. To install and runquantifyyou will need to have a correct version of Python together with thepipPython package manager installed. To fulfill these requirements, we recommend using a virtual environment that is managed by Anaconda.Install Anaconda.
(Windows only) Install Git BASH to have a Unix-like bash terminal (default options during installation should work well on most setups).
Tip
Users can right click any folder in windows and open Git BASH in that location.
Note
Be aware that a unix-like terminal on windows has some caveats. To avoid them, we recommend to run any Python code using JupyterLab (installation steps below).
(Windows only) Add
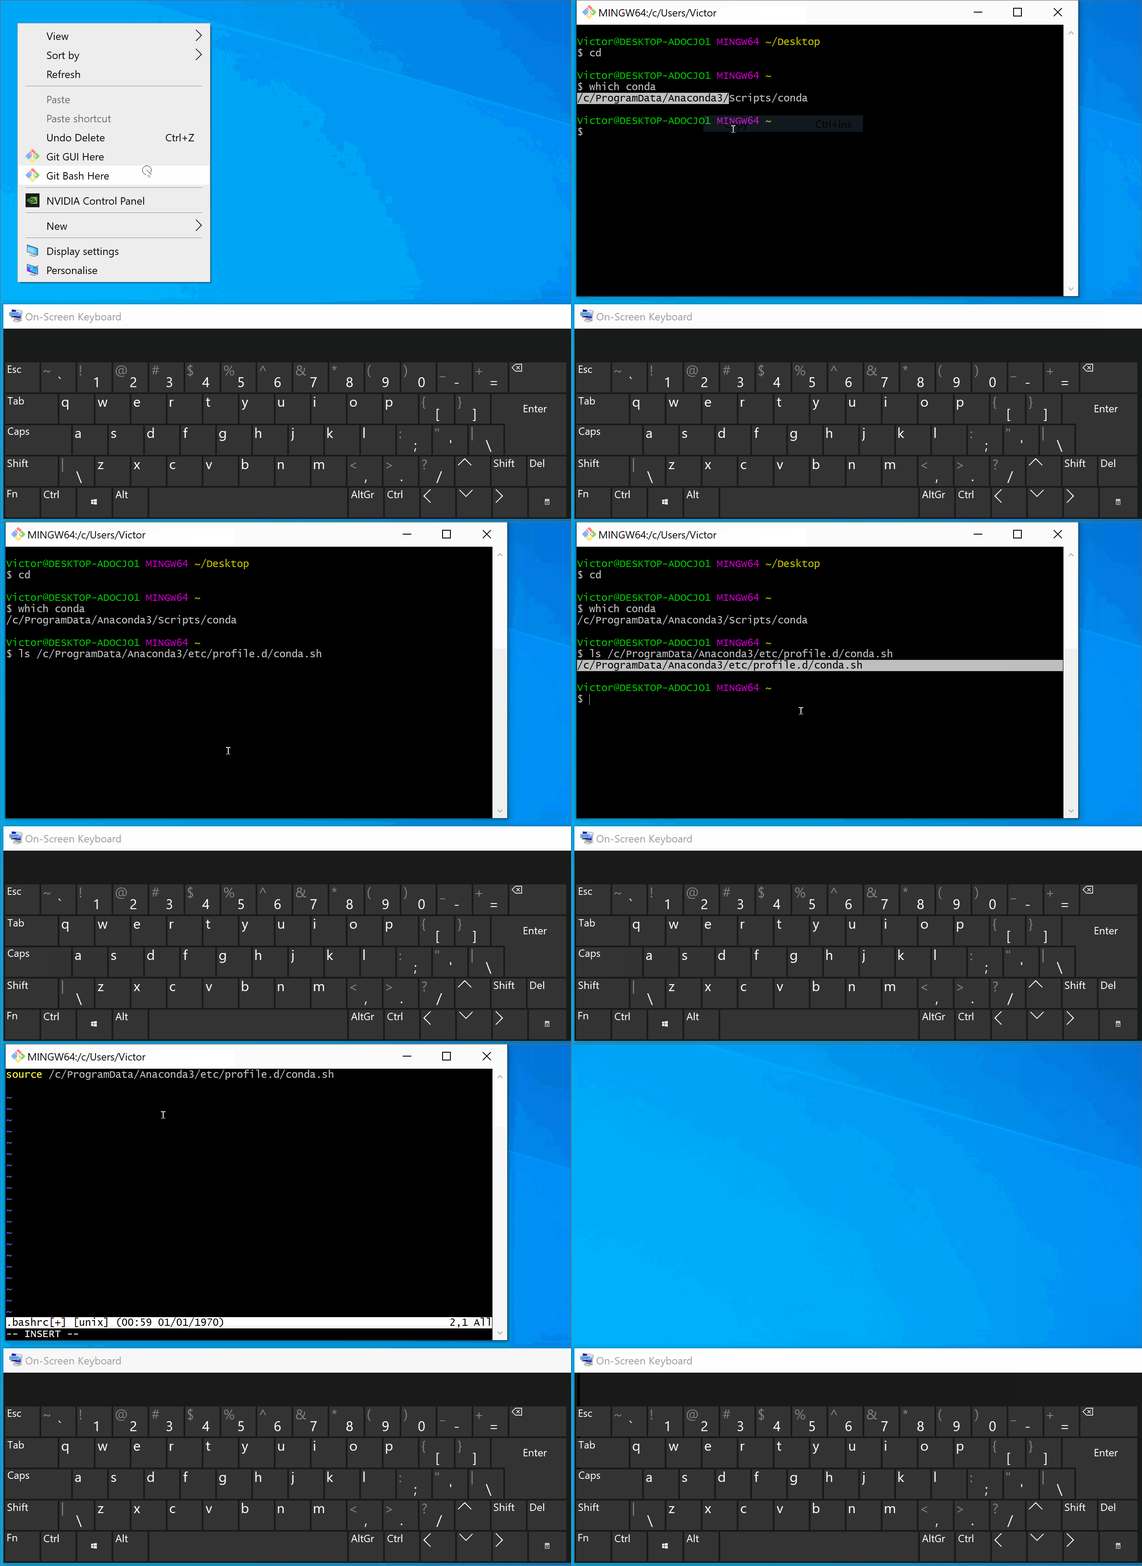
source /path/to/Anaconda3/etc/profile.d/conda.shin the.bashrc(or in the.bash_profile) to expose the anaconda in the bash terminal (see instruction below if you need help).Tip
If you followed the default anaconda installation the path to it will be similar to
/c/Users/<YOUR_USERNAME>/anaconda3/etc/profile.d/conda.shor/c/ProgramData/Anaconda3/etc/profile.d/conda.sh.Pro tip: you can drag and drop a file from the file explorer into the terminal and get the path of the file (instead of typing it manually).
Instructions: expose anaconda in the bash terminal
Below we illustrate this process in Git Bash. You can find detailed step-by-step instructions here.

Note
To confirm you have a functional installation of anaconda, run
condain the terminal. This will print the conda help message which is an indication of a working installation.Create a Conda environment, see also the Conda cheat sheet.
$ conda create --name quantify-env python=3.12   # create the conda environment, you can replace `quantify-env` if you wish
$ conda activate quantify-env                   # activates the conda environment
Tip
You can add
conda activate quantify-envat the end of the.bashrc(or.bash_profile) if you wish for this environment to be activated automatically in the terminal when it is opened (see instructions below).Install
jupyter-labin the new environment using:$ conda install -c conda-forge jupyterlab # install jupyter lab $ # add the environment as an available kernel for jupyter notebook within jupyter-lab. $ python -m ipykernel install --user --name=quantify-env --display-name="Python 3 Quantify Env"
Install
quantify-corefrom pypiIf you are interested to contribute to Quantify-core you should set it up for local development instead.
$ pip install quantify-core
Note
We currently do not have a conda recipe for installation, instead we refer to the default pip installation within a conda environment.
(Optionally) install
quantify-schedulerIf you are interested to contribute to
quantify-scheduleryou should set it up for local development instead. You only need to replacequantify-corewithquantify-schedulerin the provided commands.$ pip install quantify-scheduler
Update to the latest version#
To update Quantify to the latest version:
$ pip install quantify-core
Setting up for local development#
Ready to contribute? Here’s how to set up Quantify for local development.
Follow the Installation steps for your system skipping the last step (
pip install ...).Fork the
quantify-corerepo on GitLab.Clone your fork locally:
$ git clone git@gitlab.com:your_name_here/quantify-core.git
Install
quantify-corelocally:$ cd quantify-core/ $ pip install -e ".[dev]"
(Optional) Install
pre-commitwhich will automatically format the code using black:$ pre-commit install
Note
When the code is not well formatted a
git commitwill fail. You only need to run it again. This second time the code will be already black-compliant.Create a branch for local development:
$ git checkout -b name-of-your-bugfix-or-feature
Now you can make your changes locally.
To ensure good quality code run pylint on your code and address any reasonable code quality issues. See Editor and IDE integration for tips on how to integrate pylint in your editor or IDE.
When you are done making changes, auto-format the repository with
blackand ensure test coverage$ black . $ pytest --cov
Tip
Running parts of the test suite
To run only parts of the test suite, specify the folder in which to look for tests as an argument to pytest. The following example
$ py.test tests/measurement --cov quantify_core/measurement
will look for tests located in the tests/measurement directory and report test coverage of the quantify_core/measurement module.
Tip
Speed up tests with parallel execution
$ py.test -n 2 # where 2 is the number of cores of your CPU
Building the documentation
If you have worked on documentation or docstrings you need to review how your docs look locally and ensure no error or warnings are raised. You can build the docs locally using:
$ cd docs

$ # unix
$ make html

$ # windows
$ ./make.bat html
The docs will be located in
quantify_core/docs/_build.Tip
If you are working on documentation it can be useful to automatically rebuild the docs after every change. This can be done using the
sphinx-autobuildpackage. Through the following command:$ sphinx-autobuild docs docs/_build/html
The documentation will then be hosted on
localhost:8000Tip
Building the tutorials can be time consuming, if you are not editing them, feel free to delete your local copy of the
quantify-core/docs/tutorialsto skip their build. You can recover the files using git (do not commit the deleted files).Commit your changes and push your branch to GitLab:
$ git add .
$ git commit -m "Your detailed description of your changes."
$ git push origin name-of-your-bugfix-or-feature
Review the Merge request guidelines and submit a merge request through the GitLab website.
Add a short entry in the
CHANGELOG.mdunderUnreleased, commit and push.
Troubleshooting#
If for some reason you are not able to install or use Quantify using the prescribed ways indicated above, make sure you have a working Python environment (e.g. you can run an IPython terminal). Follow the next steps that aim at installing Quantify from source and running its tests.
Uninstall
quantify-core:$ pip uninstall quantify-core
Install from source (run line by line):
$ git clone https://gitlab.com/quantify-os/quantify-core.git; cd quantify-core
$ pip install --upgrade --upgrade-strategy eager ".[dev]"
$ pytest -v
The tests will either pass or not. In any case, please report your experience and which test do not pass by creating a
New issueon the issue tracker, your efforts are much appreciated and will help us to understand the problems you might be facing.
Downgrade to a specific version#
If for any reason you require a specific version of the package, e.g. 0.3.0, run:
$ pip install --upgrade quantify-core==0.3.0
Potential issues: PyQtGraph and PyQt5#
quantify-core has a dependency on the PyQt5 package, which itself has a dependency on the Qt5 runtime.
On most systems, the standard installation process will correctly install Qt.
The Anaconda installation should resolve issues with installation on Windows or macOS.
You may need to consult a search engine if you have a more exotic system.
macOS users#
Users with newer MacBooks that have the M1 or M2 chip will face problems when installing PyQt through pip. This can be solved by installing and running quantify-core inside an x86 compatibility environment. Please see the macOS section of Quick Install Guide for instructions.

